
Warning: this homemade vanilla ice cream recipe contains raw eggs. According to several online resources, the risk of contracting salmonella from a raw egg is 1 in 20,000. Make and consume this ice cream at your own risk, or feel free to substitute pasteurized eggs.
It’s the beginning of October and I’m sharing an ice cream recipe with you. It might seem late in the year, but if you’re like us, you’re still experiencing some warm days, and truth is, we typically eat ice cream all year round. In fact, there is no bad time for ice cream, particularly if it’s of the smooth, creamy, homemade variety. And that’s what we’re doing today – creamy homemade vanilla ice cream!
Kirk’s been dabbling in homemade ice cream for a number of years. Ever since I’ve known him, he has been a man obsessed with the beguiling ways of this frosty treat. Awhile back, my mom even gave him our old, family ice cream maker. It was an electric model with a speckled blue bucket and had only been used a handful of times. Though it had been around since I was a little girl, it was still in great condition. Kirk used that old fashioned ice cream maker until the motor finally gave out. We still have it sitting in the garage with the hopes that maybe it can be brought back from the dead with a little tinkering.
After old faithful died, we spent a couple of years looking for a suitable replacement. The fancy countertop varieties did not interest Kirk. We even tried the ice cream bowl attachment for the Kitchen Aid and while it served it’s purpose, it just wasn’t the same. A couple of years ago, I picked up a regular run of the mill, inexpensive, electric ice cream maker, made to look like the vintage ones, but composed mostly of plastic parts, as a Christmas present. So far, it has come the closest to that vintage model sitting in our garage.


Many people ask me for Kirk’s ice cream recipe. He has literally done years of research and tweaking to get it just right. Along the way, he has picked up quite a few tips and tricks to ensure the creamiest results:
Vanilla Whey Protein
Yes, like the kind that body builder and workout enthusiasts use to up their protein intake. The vanilla whey protein acts as a binder and absorbs water from the cream. If left to it’s own devices, this water will later cause ice crystals to form. By adding the whey protein, the water is absorbed creating and retaining the smooth creamy texture found in store bought ice creams. The vanilla whey protein flavor disappears into the background and imparts little to no flavor overall.
Leave Room for Air
Leave at least three inches at the top of your canister to account for, and allow for, air whipped into the ice cream during the churning process. Filling the canister too full sounds like a great idea, I mean nobody wants less ice cream, but actually results in a more compact and dense finished product. Air whipped into the mixture during churning creates a light, fluffy texture when frozen.
Use a Cooler
We set up our ice cream maker outside and the temps can be quite warm during the summer, so warm it sometimes keeps the ice cream maker from freezing the ice cream mixture. To offset the high temps, Kirk sits the ice cream maker in a large insulated cooler with the lid off and warm weather never keeps us from enjoying the ice cold spoils of our efforts. As an added bonus, the cooler also collects all the salty water that sometimes drips out of the ice cream maker.
Allow for Freezer Time
Try to make it the day before you want to enjoy it. Sometimes we have made it the day of, due to poor planning or scheduling issues, and it just does not firm up enough by the time we need to serve it. I love a soft serve, but a soupy vanilla mess is not on anyone’s must have list. Make it the day before, let it hang out in the freezer overnight, and you’ll have perfect ice cream the next day.


CREAMY HOMEMADE VANILLA ICE CREAM
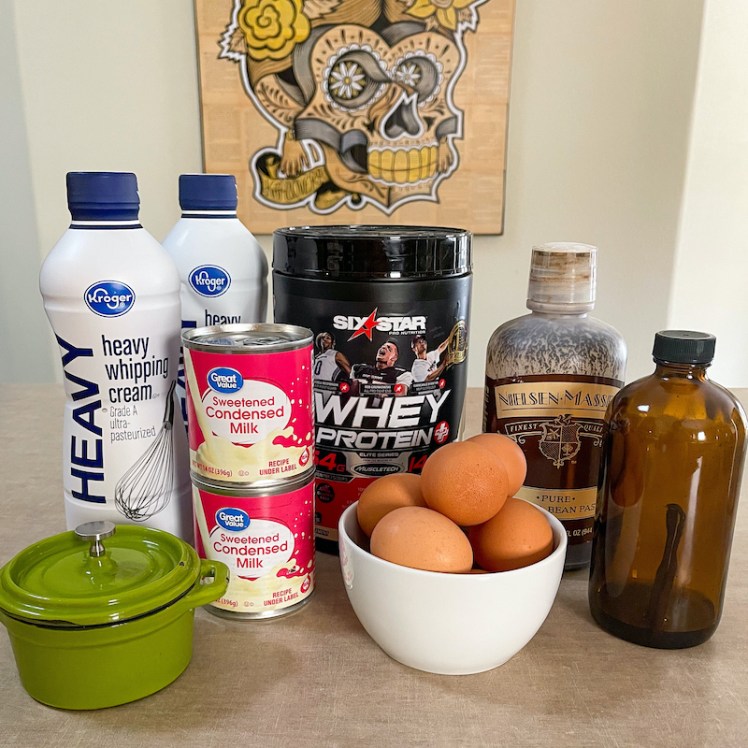
Ingredients
- 2 quarts heavy cream
- 2 cans sweetened condensed milk
- 8 large eggs
- 2 scoops (or 2/3 cup) vanilla whey protein
- 2 teaspoons vanilla extract
- 2 teaspoons vanilla bean paste
- Pinch or 2 of salt
Instructions
Place the heavy cream, sweetened condensed milk, and eggs into the 4 quart canister of an electric ice cream maker. If using a 2 quart canister, reduce the recipe by half.
Add the vanilla extract, vanilla bean paste and the vanilla whey protein powder to the canister. It’s important to add the protein powder last so that it mixes thoroughly into the base. Adding the protein powder first will cause it to stick to the bottom of the canister and make it difficult to smoothly incorporate into the mixture.
Mix thoroughly with an immersion hand blender until all ingredients are well incorporated and there are no dry pockets of protein powder left behind. Make sure there is at least three inches between the top of the canister and the ice cream mixture to allow for the mixture to expand as air is whipped in during the churning process. If your canister has a fill line on it, you might want to use that as your guideline. You may need to remove some of the mixture if the canister is too full.
Add canister to the ice cream maker. Layer ice and salt according to the instructions provided by the manufacturer.
Once ice cream has stopped churning, remove canister, pour semi frozen mixture into a large container or two smaller containers and freeze overnight.
VARIATIONS
Add Mix-ins
Add chopped nuts, candy pieces, small chunks of fruit, etc. by layering the already churned ice cream into containers and alternating it with layers of whatever tasty bits you want to add.
Pistachio Ice Cream
Omit the vanilla bean paste. Pulverize desired amount of pistachios to create between 1/4 cup and a 1/2 cup of pistachio dust. We use our Ninja Bullet for this process. Mix the pistachio dust into the ice cream base before churning. While the ice cream is churning, rough chop one cup (or more, your preference) of pistachios by hand and set aside. When the ice cream has finished churning, layer the ice cream and the chopped pistachios into a container. Top scooped ice cream with a little dust and chopped pistachios before serving.
Buttermilk Ice Cream
Substitute one quart of buttermilk for one quart of heavy cream when preparing the ice cream base. Mix and freeze as usual. This one is a personal favorite.
Strawberry Buttermilk Ice Cream
Omit the vanilla extract and vanilla bean paste. Substitute one quart of buttermilk for one quart of heavy cream when preparing the ice cream base. Pulverize enough freeze dried strawberries (we ordered them from Amazon) to result in 1/2 cup to 3/4 cup of strawberry dust. Hand crumble approximately 1/2 cup of freeze dried strawberries. Add freeze dried strawberry dust and crumbled strawberries to the ice cream base before churning. Mix thoroughly. After mixture has finished churning, pour ice cream base into a container, alternating layers of ice cream with large spoonfuls of strawberry preserves (8oz jar in total). Using a spatula, swirl the preserves throughout the ice cream by holding the spatula up right and dipping it into the mixture until is touches the bottom of the container. Swirl the spatula throughout the mixture to create a ribbon of strawberry preserves that will be apparent when serving.


So, how about some Creamy Homemade Vanilla Ice Cream this weekend? There’s still plenty of warm days left to sit back and enjoy a few scoops.
Stock up on our rubs, sauces and jellies at AlbuKirkySeasonings.com and keep up with what we’re cooking on our Facebook and Instagram pages. See you next time!

One thought on “Creamy Homemade Vanilla Ice Cream”